- Published on
I love a good cookie crumb crust! Why? First, I love cookies. Second, they are so easy and can add some zest to your dessert.
Cookie Crumb Crusts are so under-rated!!! I love them for cheesecakes, ice-box cakes, and pies! They are so easy. Most of us usually turn to the old faithful graham cracker crust, but there are more possibilities. The ones below work very well for crumb crusts and have flavors which pair well or enhance with certain your dessert’s main ingredients.
Another bonus for using cookie crumb crusts is that you can use gluten-free cookies, which are available most everywhere. I’ve even used gluten-free animal crackers!


- Published on
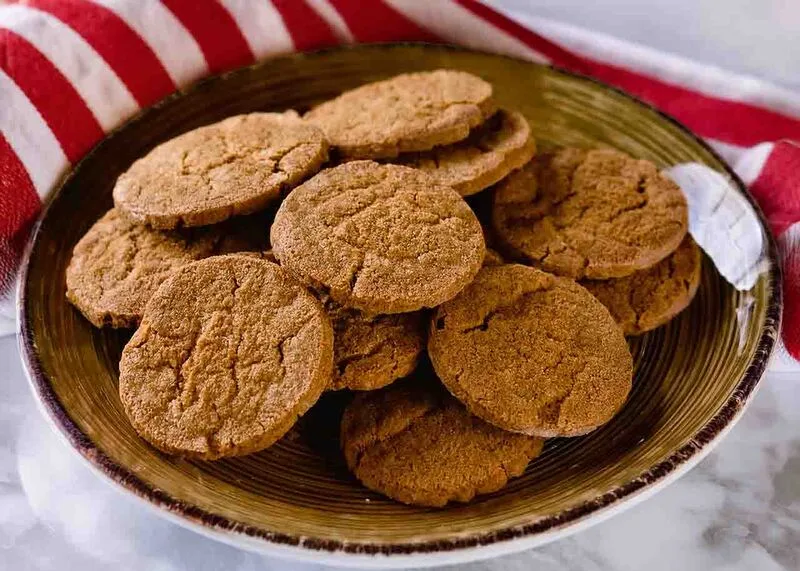
Gingersnaps are an awesome cookie for a crumb crust. I love them paired with a lemon icebox pie, pumpkin pie, pumpkin cheesecake, or lemon cheesecake. Lemon and ginger are a sure match!
The spices in them are a bit strong, so make sure it will enhance, and not compete with your main pie or cheesecake ingredient. About two cups of gingersnaps make a 9-inch pie crust.
The spices in them are a bit strong, so make sure it will enhance, and not compete with your main pie or cheesecake ingredient. About two cups of gingersnaps make a 9-inch pie crust.

2 cups gingersnap crumbs
2 tablespoons brown sugar
1/4 teaspoon cinnamon
4 tablespoons of salted butter, melted (or if using unsalted butter, add 1/4 teaspoon salt)
bit of butter (about 1 tablespoon) for greasing the pan
9-inch pie plate for pie
9 or 10-inch springform pan for cheesecake (I've made a cheesecake in a cast iron skillet, so no problem if you do not have a springform pan!!)
- Preheat oven to 325 degrees.
- Melt butter in a saucepan over low heat. - do not let it scorch or brown. OR Melt in microwave.
- In a food processor, combine gingersnaps brown sugar, cinnamon, and salt until it feels sandy. (I break the snaps in half while adding them to the processor.) OR If you do not have a food processor, break the cookies into pieces, put them in a large ziplock bag, and roll the heck out of them with a rolling pin.
- For a food processor - Pour in melted butter and pulse several times until mixed. For the ziplock bag technique - put crumbs in a mixing bowl and stir in the melted butter.
- Putting the crust in the pan:
- For a pie: With clean hands, pat the crumb mixture into the bottom and up the sides of your 9-inch pie plate. Then, with your thumb or a spoon, round out the area where the sides and bottom of crust meet.
- For a cheesecake: No need to grease the pan. Press the cookie mixture into the bottom only of a 9 or 10-inch diameter springform pan.
- If pre-baking for a filling that will be baked. Bake about 8 minutes in preheated 325 degree oven - do not over bake! You just want it to bind together.
- If baking for a filling that is no-bake, then bake for 10-12 minutes at 325 degrees until lightly browned. Do not burn!
- Let cool for 30 minutes to an hour before filling.
- Published on

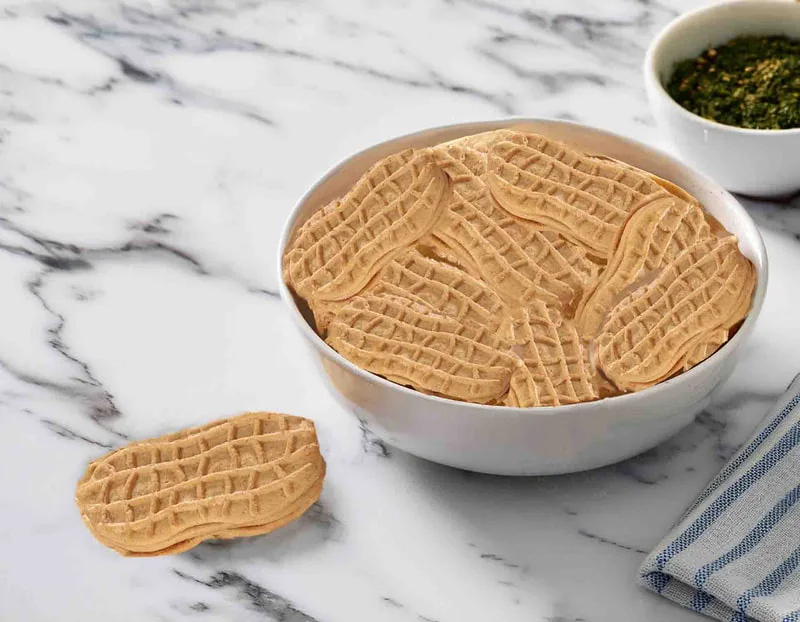
There is nothing like a peanut butter cookie crumb crust for some pie recipes! It is my absolute favorite for peanut butter chocolate cheesecake. I have to admit prejudice - I have secretly eaten an entire package of these in a day... These and Oreos are the only two store-bought cookies I cannot resist. Use about 30 of these for a pie crust - do not scrape off the peanut butter filling!
- You can make this as a no-bake crust or a baked one.
- For the baked crust, bake for around 8 minutes in a 350 degree oven, then let cool for about an hour before filling. The baking makes for a crispier crust, which holds together well.
- If you make the no-bake crust, freeze for about an hour before filling. Freezing helps it hold its shape.
28 Nutter Butter Cookies = about 2 & 1/4 cups of cookie crumbs
5-6 tablespoons butter, melted (Use 5 and if it is not holding together, add an additional tablespoon.)
Baked Crust:
- Preheat the oven to 350 degrees.
- Put Nutter Butter cookies (I usually break in half before adding) in a food processor and pulse until they are a sandy texture. If you do not have a food processor, break the cookies into pieces, put them in a large ziplock bag, and roll the heck out of them with a rolling pin. )
- Melt the butter in a saucepan on the stove (do not scorch) or in the microwave.
- In a mixing bowl, stir together the cookie crumbs and melted butter, until the mixture is the texture of wet sand. This is the time to add a bit more melted butter, if you need to.
- Putting it in the pan -
- For pies: Press the mixture into a 9-inch pie plate, starting with the sides and then cover the bottom. Use your thumb of a spoon back to round out the area where the bottom and the sides of the pan and meet. This helps with cutting it later.
- For cheesecake: Using clean hands, press the cookie crumb mixture into the bottom of the springform cheesecake pan. You do not need to grease it ahead of time.
7. Remove from oven and cool for at least 30 - 60 minutes before filling.
No-Bake Crust: Follow steps 2-5 above, then chill for an hour in the refrigerator or freezer. (Some recipes call for you to freeze it - just follow your recipe's instructions.)
- Published on
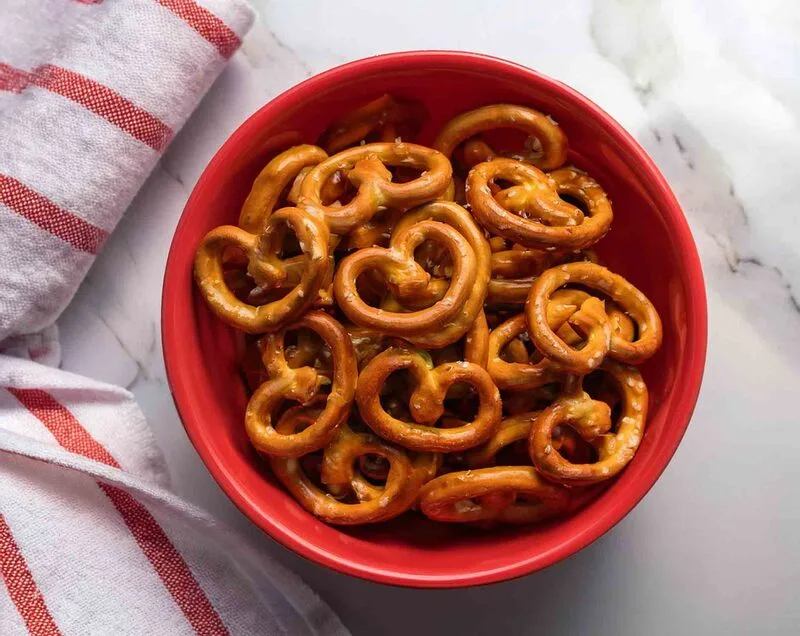
Pretzels are the bomb! AND, you can make a pie or cheesecake crust with them, no-bake or baked. You can even use gluten-free pretzels. You Must - use mini pretzels. They are easier to crush into crumbs.
The saltiness of pretzels can really add some zing to pies. But, be sure to use unsalted butter, as the pretzels are salty.
Pretzel crumb crust can be made for a no-bake crust or a baked one.
The saltiness of pretzels can really add some zing to pies. But, be sure to use unsalted butter, as the pretzels are salty.
Pretzel crumb crust can be made for a no-bake crust or a baked one.
For a no-bake crust, make sure to freeze it for about 20 minutes before filling. Baking makes it hold together a bit better and adds a nutty flavor. Again, let it cool completely before filling.
Some ideas for using: no-bake chocolate pies, pecan pies, cheesecakes - especially chocolate or peanut butter ones.
Some ideas for using: no-bake chocolate pies, pecan pies, cheesecakes - especially chocolate or peanut butter ones.
Ingredients for a 9-inch pie pan or a 9 to 10-inch springform pan for cheesecakes:
1 & 1/2 cups mini-pretzel crumbs - made from about 4 cups of mini pretzels
1/2 cup unsalted butter
a bit more butter for greasing your pie plate
1/4 cup brown sugar
Instructions:
(I like the baked version best!)
For the Baked Version:
7. Cool at least 30 - 60 minutes before filling. Follow directions for your recipe.
1 & 1/2 cups mini-pretzel crumbs - made from about 4 cups of mini pretzels
1/2 cup unsalted butter
a bit more butter for greasing your pie plate
1/4 cup brown sugar
Instructions:
- Make crumbs from the pretzels: In a food processor or in a sealed ziplock bag with a rolling pin.
- Melt the butter on the stovetop or microwave - do not scorch it!
- Put in a mixing bowl: pretzel crumbs, sugar, and melted butter. Stir all together.
- For a pie: With clean hands, press the crumb crust into the pie pan - on the bottom and up the sides. With your thumb or a spoon, round out where the sides and the bottom of the pan meet. This helps in cutting.
- If making a cheesecake, simply press on the bottom only of the springform pan.
(I like the baked version best!)
For the Baked Version:
- Preheat your oven to 350 degrees.
- Follow Steps 1-5 above.
7. Cool at least 30 - 60 minutes before filling. Follow directions for your recipe.
- Published on
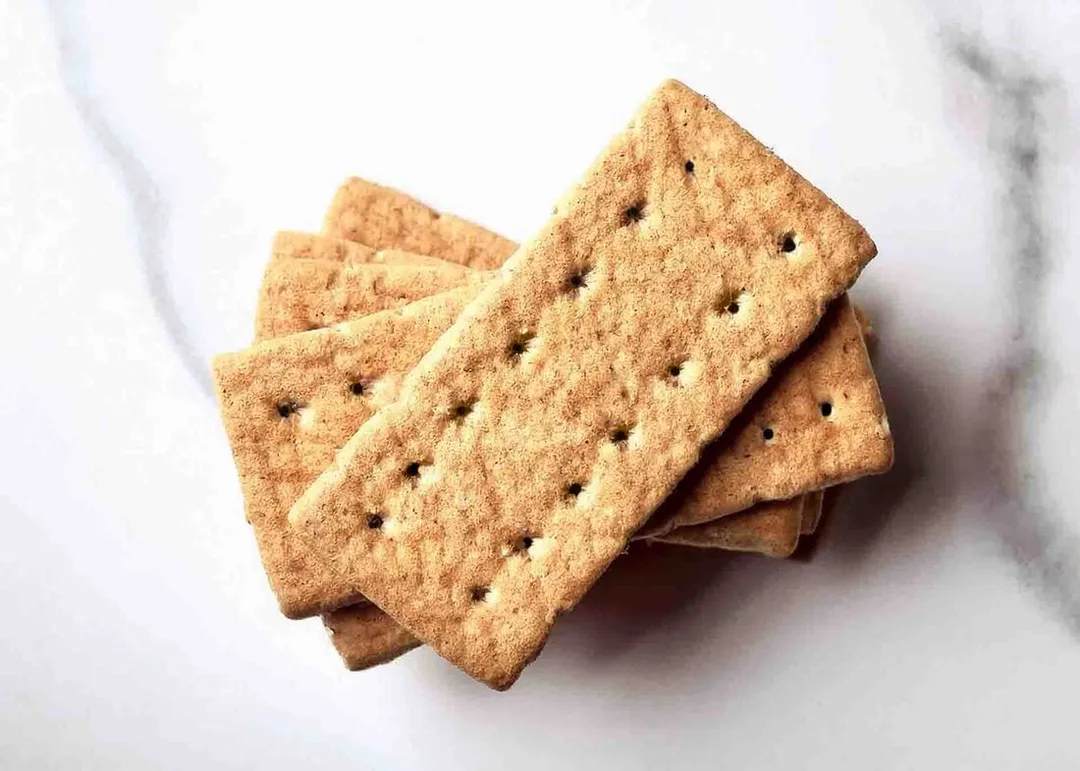
Graham cracker cookies are usually the most popular recipe ingredient when a cookie crumb crust is needed in a recipe. The taste, while pleasing, is somewhat plain. That is not a bad thing for most desserts - the main ingredient of your lemon cheesecake or chocolate icebox pie can stand out, rather than struggle with a strong-flavored crust. If you want a touch more flavor, you can spice it up a bit by adding a little orange or lemon zest! Oooh - or lime zest for a Key Lime Pie Crust!!
Baked version for cheesecake or pie -
This must be baked, as it contains an egg white.
I have made this crust many, many times. It never lets me down!
Crust Ingredients for a 9-inch pie pan or a 9 to 10-inch springform pan for cheesecakes:
2 cups graham cracker crumbs
1/2 cup unsalted butter, melted
1/4 cup sugar
1 egg white
Crust Directions:
- Preheat oven to 350 degrees.
- Make crumbs from graham crackers in a food processor or a sealed ziplock bag with a rolling pin.
- In a bowl, stir graham cracker crumbs, sugar, melted butter, and egg white until blended.
- With clean hands, press on bottom only of a 9 or 10-inch springform cheesecake pan.
- For a pie pan, grease the pan first. Then, press the crumb mixture into the bottom and sides of the pie pan. With your thumb or a spoon, round out the area where the sides / bottom of the pan meet.
- Bake for 8 - 10 minutes, until very slightly browned. Do not over bake!
- Cool on a rack for at least 20 - 30 minutes while you are making a baked dessert or an hour for a no-bake dessert. Always look at your dessert recipe for guidance.
- Published on
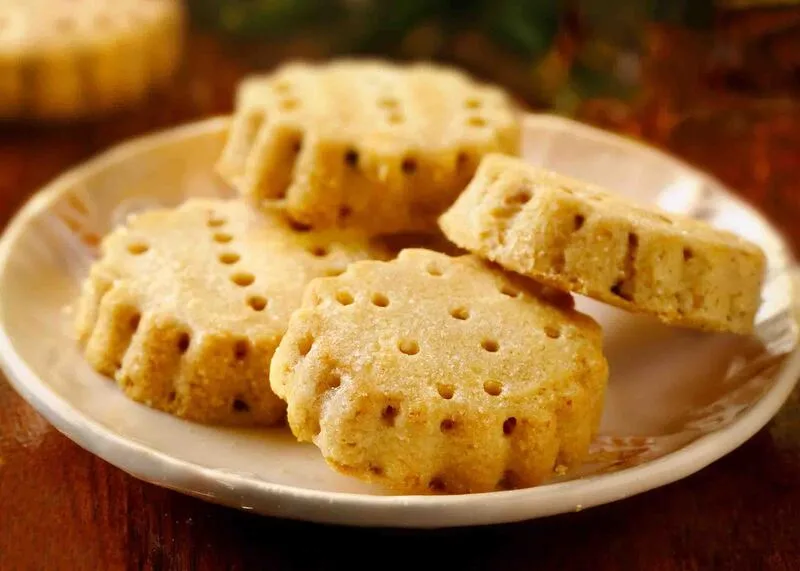
Shortbread cookies work fabulously for cookie crumb pie crusts. Their buttery quality allows them to easily to bind together into a crust. Like graham crackers, they are a little plain-tasting, but again, that’s what you need sometimes to make your main dessert ingredient sing!
2 & 3/4 cups shortbread cookie crumbs
1 tablespoon sugar
6 tablespoons melted butter
9-inch pie pan
2 & 3/4 cups shortbread cookie crumbs
1 tablespoon sugar
6 tablespoons melted butter
9-inch pie pan

No-Bake Version:
Follow Steps 1 - 5 above.
Step 6: Bake in preheated 350-degree oven for 8 minutes. Let cool for at least 20 minutes before filling.
- Make crumbs from the cookies: In a food processor or in a sealed ziplock bag with a rolling pin. (I usually break them in half, before making into crumbs.)
- Melt the butter on the stovetop or microwave - don’t scorch it!
- Put in a mixing bowl and stir together: cookie crumbs, sugar, and melted butter.
- With clean hands, press the crumb crust into the pie pan - on the bottom and up the sides. Don’t be stingy with it!
- Chill for one hour or more before filling.
Follow Steps 1 - 5 above.
Step 6: Bake in preheated 350-degree oven for 8 minutes. Let cool for at least 20 minutes before filling.
- Published on
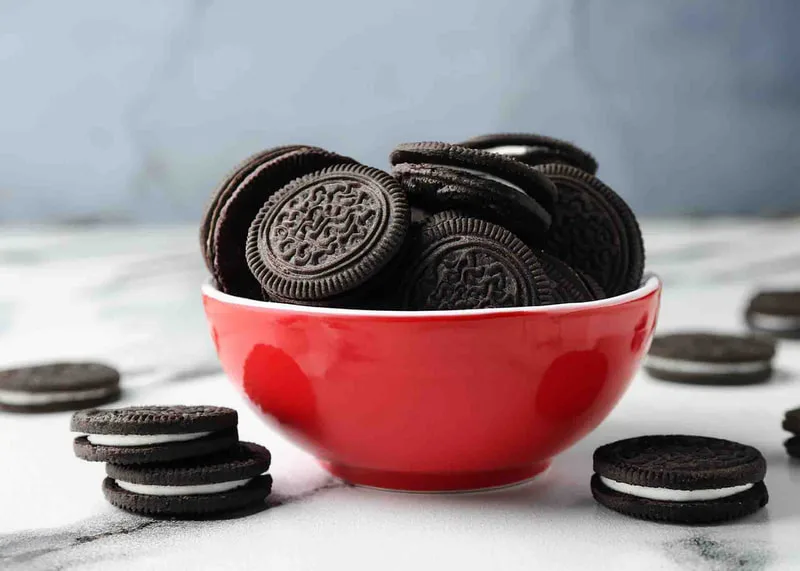
Another favorite for cookie crumb pie crusts is the Oreo. There are others that will work fine, but oh, I love an Oreo. Oreo crusts are especially good with chocolate icebox pies and peanut butter cheesecakes. Always use single cream Oreos. Please leave the cream filling, don’t scrape it off. It helps the crumbs to bind together! Alternately - you can use the golden Oreos - the vanilla ones; they make another great cookie crumb crust. I especially love them with a lemon icebox pie!

Ingredients for 9-inch pie pan or 9 to 10-inch springform cheesecake pan:
2 cups Oreo cookie crumbs = about 23 cookies
5 Tablespoons butter, melted
Instructions for:
Pre-Baked Version - I highly recommend pre-baking the Oreo crust for cheesecakes and pies (even no-bake recipes). It helps the crust bind together and it adds a bit of flavor.
Instructions for:
No-Bake Version: I absolutely recommend pre-baking the Oreo crust, even for no-bake pies and cheesecakes. However, if your recipe says do not bake the crust, then here is how to make it.
2 cups Oreo cookie crumbs = about 23 cookies
5 Tablespoons butter, melted
Instructions for:
Pre-Baked Version - I highly recommend pre-baking the Oreo crust for cheesecakes and pies (even no-bake recipes). It helps the crust bind together and it adds a bit of flavor.
- Preheat oven to 350 degrees.
- Make crumbs: In a food processor or in a sealed ziplock bag with a rolling pin. (I usually break them in half, before making into crumbs.) They should be a sandy texture.
- Melt the butter on the stovetop or microwave - do not scorch it!
- Put the cookie crumbs and melted butter in a mixing bowl and stir together well. The mixture will be like damp sand.
- Putting it in the pan: With clean hands, press the crumb crust into the pie pan - on the bottom and up the sides. Then with your thumb or a spoon, smooth or round out the area where the side and bottom of the pan meet - helps in cutting. If you are making a cheesecake, simply press it on the bottom only of the springform pan.
- No-bake dessert: Bake 10-12 minutes in 350 degree oven. Do not let it burn!
- For a baked dessert: Pre-bake in a 350 degree oven for 8 minutes. Do not let it burn!
Instructions for:
No-Bake Version: I absolutely recommend pre-baking the Oreo crust, even for no-bake pies and cheesecakes. However, if your recipe says do not bake the crust, then here is how to make it.
- Follow directions 2 - 5 above.